Scripts are a great way to extend the features of Altium Designer: as soon as you have custom needs, writing a script could be a good option.
If you have already programmed some Altium Designer scripts, you can directly jump to my Code examples at the end of the article.
About the use of scripts
In the past I wrote a starting guide about scripts. If you are not used to the scripting system of Altium Designer, I would recommend to read this article first:
Available programming languages
Altium Designer is bundled with different script interpreters, supporting the following languages:
- DelphiScript
- EnableBasic
- JavaScript
- VBScript
- TCL (no dedicated scripting page, does it mean restricted support?)
The most widely used is probably DelphiScript. At least the vast majority of examples are written with this language.
From what I have seen so far, VBScript holds the second position. The syntax is quite, but not strictly, similar to VBA (Visual Basic for Applications), widely used for MS Office macros.
IMPORTANT NOTICE: Since Altium Designer version 18, you’re not asked what language you want to work with while creating a script file. DelphiScript (*.pas) is assumed to be the one and only language for scripts.
Don’t worry, the other languages cited above are still supported. For the moment…
Documentation for scripts developers
The first version of the scripting documentation (“wiki.altium.com”) was a nightmare. It was very difficult to find where to start when you were a newcomer.
The today’s version is better in terms of organization and readability (“techdocs.altium.com”). But it has never been ported to the new Altium Designer documentation system (“altium.com/documentation”)! The Altium teams don’t seem very much involved in pushing the scripting system forward.
For that reason I would take the “techdocs” documentation as a reference (last update in late 2017).
Because the Altium Designer SDK probably shares the API with the scripting system, the Delphi SDK reference documentation could be considered as the “updated version” of the scripting system documentation.
Understanding how scripts work
If I were you, I would start by reading the following documentation articles:
- The scripting documentation entry point
- How is the platform architectured: models, objects, clients, servers, …
If you want to know more about how the system is built, you can read the following document (253 pages). It is described as “a concise reference of the Altium Designer low level system API as part of the Altium Designer Run Time Library”.
Working with the API
The API (Application Programming Interface) is the part of Altium Designer which allow developers to interact with internal functions from “outside”, ie. from user scripts / add-ons.
Based on what you’re trying to do, you will use different APIs:
- Client API
- Schematic API
- PCB API
- Integrated Library API
- Vault/Nexus API
- Workspace Manager API
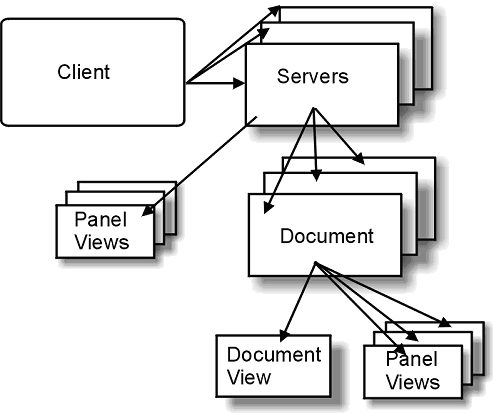
“The client module is represented by its IClient interface object and you have the ability to take a peek into the data structures through this IClient interface. The client maintains a list of loaded servers, opened server documents, loaded server processes and resources.”
“Servers are represented by IServerModule interfaces. These interfaces are declared and partially implemented in the RT_ClientServerInterfaces unit.”
Each of the Schematic API, PCB API, Integrated Library API and Vault/Nexus API inherits from a “Server object model”:
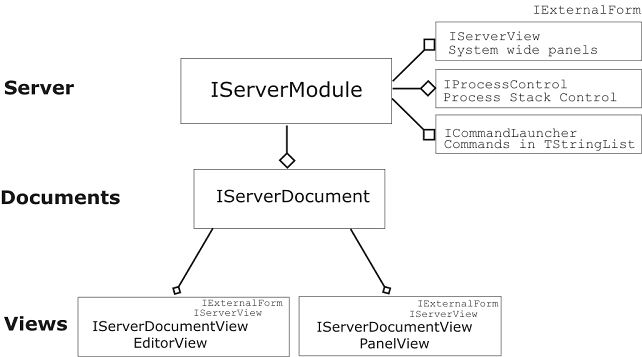
The Workspace Manager doesn’t inherit the “IServerModule” interface. Instead it gives an access to the DM interfaces (Documents Model? Documents Manager? Design Manager?), but it’s kind of “read-only”. Unlike the SCH Server or PCB Server, the Workspace Manager is always available even if no document is open.
“The Workspace Manager is a system extensions server which is always running when Altium Designer is loaded in memory. […] This Workspace Manager provides information on how a project is structured, information on nets and its associated net aware objects of source and implementation documents.”
Here is the IWorkspace object structure:
- IWorkspace
- IProject
- IDocument
- ISheetSymbol
- IComponent
- IBus
- …
- IDocument
- IProject
The whole API documentation is available in a single PDF document (1144 pages). This is the perfect document in which you could search for any function or parameter.
Let’s go coding!
Take care…
In the development process, something may go wrong. A buggy script could really mess up an entire project. Be sure to always test your scripts on dummy project files.
Furthermore, a badly written script can lock-up the Altium Designer user interface, forcing you to kill the program the dirty way. Be prepared for that!
Development tools
Altium Designer itself act as an IDE (Integrated Development Environment) for script programming. I don’t really like the embedded editor but I must admit it gives you some power in the development process.
I personally use the code completion feature as an “in-editor documentation”. At any time, hit CTRL + Space to grab the auto-completion box.
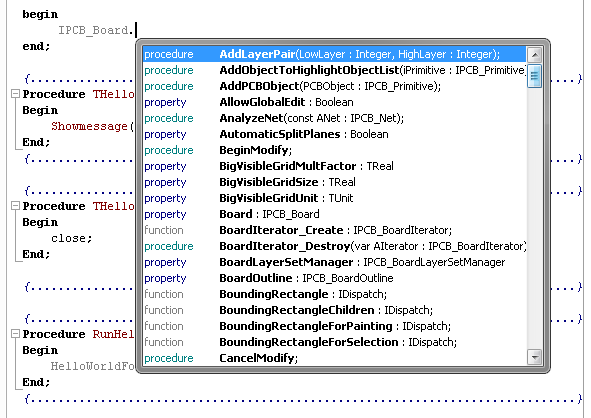
Code completion 
Breakpoints
In the good old days, i.e. until Altium Designer 17.X, a “Run Process” direct access were available. This was really helpful to test and debug some commands outside of a script.
Since Altium Designer version 18 this dialog has disappeared. A shame for us as developers.
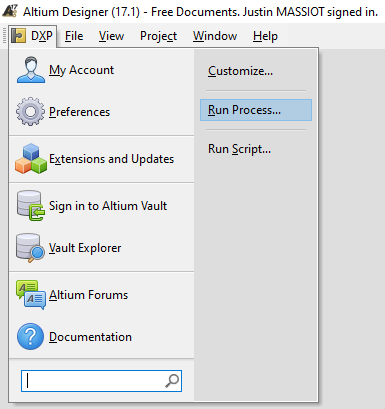
DXP > Run Process 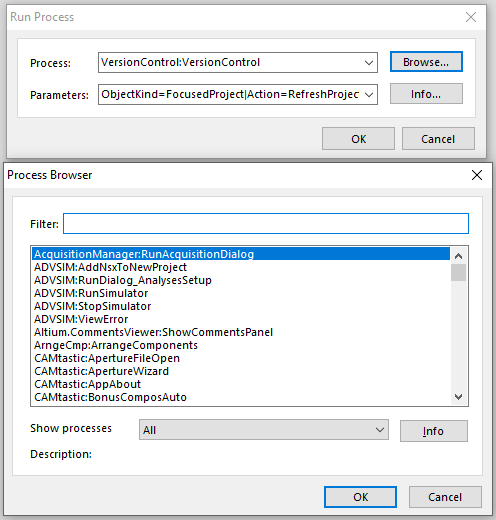
Run Process dialog box
Documentation (again)
Some documentation pages can really help you being efficient in your programming tasks:
- Scripting system overview and setup: presentation of the IDE interface and the scripting concepts
- Script editor tools: beyond text edition
- Scripting system panels: the IDE interface
- Debugging scripts (self-explanatory)
Keyboard shortcut keys available in the scripting context are listed in the “Script editor tools” page.
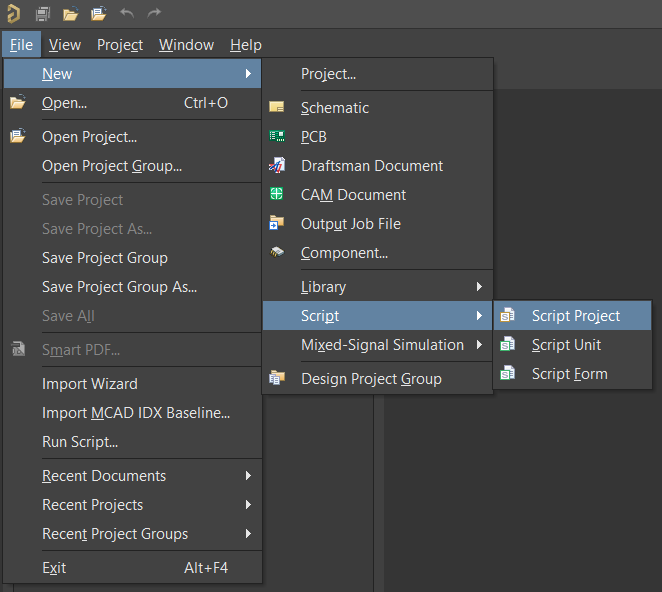
Create the script
Creating a script (without a graphical interface) is an easy task:
- With Altium Designer version 18 and newer:
- File > New > Script > Script Unit
Noticed that you can’t choose the language? DelphiScript only (*.pas)! Fortunately you can “Save As” the file and force a new extension manually.
- File > New > Script > Script Unit
- With AD17 and older:
- File > New > Script Files > {{your preferred language}} Script Unit
The official documentation won’t encourage you to create a script outside of a script project, but if you don’t need to split your code across multiple files you may not need a project file.
“When multiple scripts are in a project, any script (using the same language set) within that project has access to global variables and procedures. All scripts in a project are ‘visible’ in effect, so a procedure in one script can call another procedure in different script within the same script project.”
Altium Designer 18 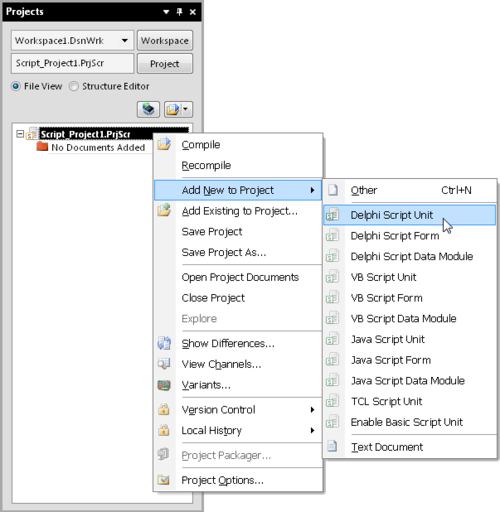
Altium Designer 17
Take inspiration from others
Again, the official script examples are here to help when trying to program a script from scratch.
If you want to broaden your mind, the “Altium Designer add-ons” project is probably the thing you should look at. Several users posted their codes and many use cases are addressed (schematics, PCB, automation, release process, …). Mostly written in DelphiScript, but other languages are also available.
Geoffrey HUNTER gave us its feedback from his programming experience with Altium Designer scripts: Altium scripting and using the API, PCB-related API.
He also made his scripts publicly available (VBScript). This is a solid source of inspiration: AltiumScriptCentral.
Code examples
All my examples are written in VBScript. If you want to program in an other language, you will need to adapt the following code snippets.
No graphical interface example for the moment, but don’t worry: many tasks can be achieved without having one. If you absolutely need a GUI, explore the documentation and look at the examples.
Pop-up dialogs
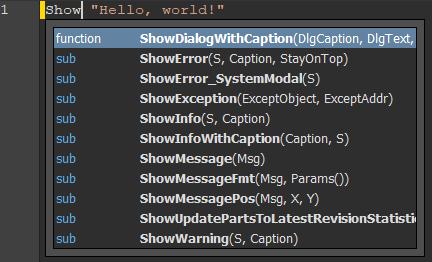
First things first: let’s test the execution of a simple script by popping-up dialogs to the user!
ShowMessage "This is a standard message"
ShowError "There is an error"
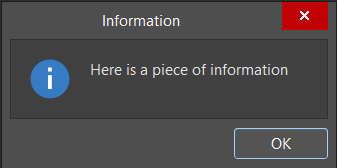
ShowInfo "Here is a piece of information"
Don’t know how to run the script? Didn’t you read the above instructions too fast?! I don’t blame you: here is the cheat sheet.
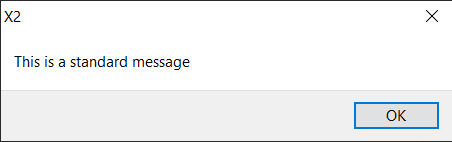
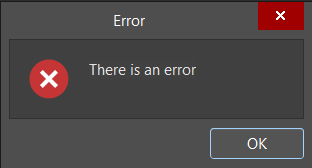
The auto-completion box (CTRL + Space) shows us every possible “ShowSomething” dialog box types.
Write to the “Messages” panel
This is my preferred way to show the progress of a script execution. Plus it can tell the user on which objects the script did some modifications.
GetWorkspace.DM_MessagesManager.ClearMessages ' clear previous messages to see only those which are related to the current function
GetWorkspace.DM_ShowMessageView ' show up the 'Messages' panel
GetWorkspace.DM_MessagesManager.BeginUpdate
GetWorkspace.DM_MessagesManager.AddMessage "[Info]", "Part '" & foo & "' has been upgraded to '" & bar & "'.", "Script: MyScriptName", GetWorkspace.DM_FocusedDocument.DM_FileName, "", "", 2, False
GetWorkspace.DM_MessagesManager.EndUpdate
Each AddMessage() instruction could be associated with a small image to illustrate the message. Have a look at the image index table: “2” is the equivalent for “Part” (‘IndexPart’).

Verify things you are going to work on
As a good programming habit, check every objects you’re gonna work with:
Sub Check
  ' Check if Client is available
  If Client Is Nothing Then Exit Sub
  ' Check if GetWorkspace is available
  If GetWorkspace Is Nothing Then Exit Sub
  ' Check if the active document is a schematic sheet
  If GetWorkspace.DM_FocusedDocument.DM_DocumentKind <> "SCH" Then
    ShowError "This script must be loaded from an active schematic sheet."
    Exit Sub
  End If
  ' Verify that the file path really exists
  If Not FileExists(GetWorkspace.DM_FocusedDocument.DM_FullPath) Then
    ShowError "Please save your file before trying to operate on it."
    Exit Sub
  End If

  ' Do your stuff here

End Sub
Obtain the current document object
Workspace:
GetWorkspace.DM_FocusedDocument
Client:
Client.OpenDocument("SCH", GetWorkspace.DM_FocusedDocument.DM_FullPath)
Server:
SchServer.GetCurrentSchDocument
' OR
SchServer.GetSchDocumentByPath(GetWorkspace.DM_FocusedDocument.DM_FullPath)
Navigate through an entire document
Now you would be tempted to act on objects contained in a document: iterators + filters are the way to go.
Here is an example which loops on every parameters of every parts of the currently focused schematic document.
Set SchDoc = SchServer.GetCurrentSchDocument
Set SchDocIter = SchDoc.SchIterator_Create ' scan the document for all available objects
SchDocIter.AddFilter_ObjectSet(MkSet(eSchComponent)) ' get Sch components only, see https://techdocs.altium.com/display/SCRT1/Schematic+API+Types#TObjectId for more info
Set SchCurComponent = SchDocIter.FirstSchObject
While Not(SchCurComponent Is Nothing) ' loop on all components of the schematic sheet
  Set SchCompIter = SchCurComponent.SchIterator_Create ' scan the component for all available information
  SchCompIter.AddFilter_ObjectSet(MkSet(eParameter)) ' get component parameters only, see https://techdocs.altium.com/display/SCRT1/Schematic+API+Types#TObjectId for more info
  Set SchCurComponentParameter = SchCompIter.FirstSchObject
  While Not(SchCurComponentParameter Is Nothing)
    ' Do some stuff with the parameter
    ShowMessage SchCurComponentParameter.Name & " = " & SchCurComponentParameter.Text ' this is just an example
    Set SchCurComponentParameter = SchCompIter.NextSchObject ' go to next parameter
  WEnd
  SchDoc.SchIterator_Destroy(SchCompIter)
  Set SchCurComponent = SchDocIter.NextSchObject ' go to next component
WEnd
SchDoc.SchIterator_Destroy(SchDocIter)
Undo/Redo
It’s convenient for the end user to be able to revert the changes made by a script. This is your job, as a developer, to tell the system if the “Undo” feature would work and how.
You can decide what to put in the undo stack. If you’re doing a lot of modifications, I would recommend to do a single call of the below functions. This way, the “Undo” command will revert all the changes at once.
' Initialize the Robot Manager to activate the Undo stack
Call SchServer.ProcessControl.PreProcess(Client.CurrentView, "")

' Do your modifications here

' Clean-up the Robot Manager
Call SchServer.ProcessControl.PostProcess(Client.CurrentView, "")
Editing the content
Simple things to know before editing the content of a document.
SetCursorBusy ' the mouse pointer indicates that the function is running
Client.OpenDocument("SCH", Document.DM_FullPath).Modified = True ' set the document "dirty" to tell that it has been modified

' Do your modifications here

ResetCursor
SchServer.GetCurrentSchDocument.GraphicallyInvalidate ' force the graphical engine to refresh what is currently visible
More to come…
I’ve planned to write more articles about scripting. Stay tuned!

Please, modify the template to make it printable. Now it occupies only half of the page and the font is enormous.
Hello Maciej,
Thank you for your feedback.
I’m sorry about this inconvenience. As you may now, website designs these days are mainly driven by how they render on mobile devices. This is clearly a major concern compare to how they print.
I use an “off-the-shelf” template and it effectively seems to render quite bad for printing. But I must admit I’m not really favorable printing web pages…
Anyway, I will try to work that out in the future days/weeks.
Maciej,
I’ve made some improvements on how the content is formatted for printing. That’s not perfect but this should do the job.
For everything related to the content size, I encourage you to use the “scaling” feature of your web browser.
Justin
Thank you very much for this introduction. I wonder why Altium did not include any Information in their new documentation.
Glad to see it can help!
As I said, the Altium teams don’t seem much involved in letting others “extend” their tools these days.